So you’ve decided to order custom packaging for the very first time. Cool! You’ve made a good choice.
The process for ordering custom is a little bit different than ordering stock packaging. You’ll be required to make a few more decisions, about elements you might not have thought about before.
This is a good thing. Custom packaging puts YOU in control of everything from protection to aesthetics and everything in between.
To help you prepare for your first-ever custom packaging order, we’ve put together an easy guide that covers exactly what you need to know, with a focus on packaging used by ecommerce businesses for shipping. Here are five things to consider before ordering custom packaging for shipping to your customers.
1. Box Style
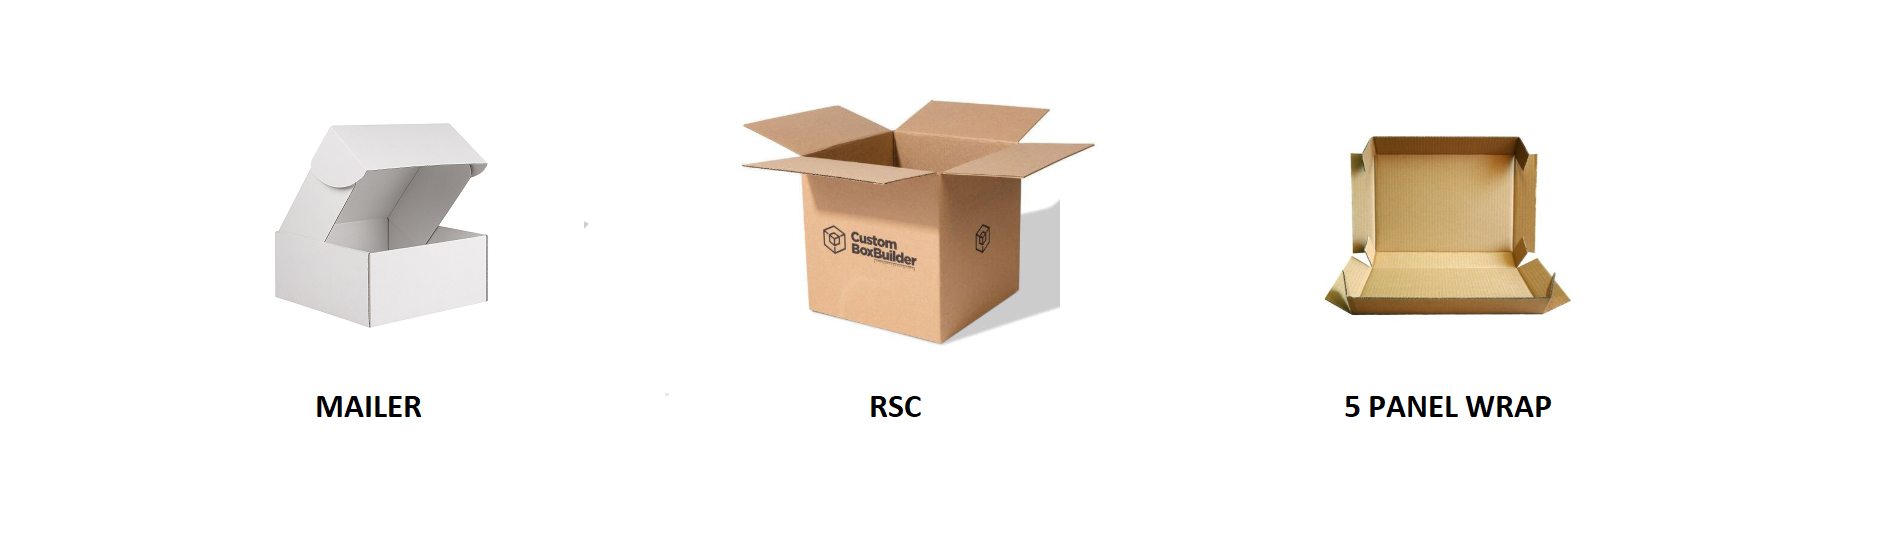
First and foremost, you’ll need to decide what style of box you need. Three of the most popular box styles for shipping to your customers are the Mailer, the RSC and the Five-panel Wrap.
The Mailer
The most popular choice for e-commerce companies and subscription box businesses, the Mailer box offers the best combination of form and function. It’s self-locking, requires no glue to manufacture and features plenty of unobstructed, tape-free areas for you to add printed designs, including the inside of the box. With the mailer, you get an unmatched unboxing experience!
Because it’s self-locking, the mailer can make fulfilling your orders easier and faster; however, it does require more material and a more time-consuming cutting method to produce, so it’s typically 10% more expensive than other box styles per square foot of material used.
The Regular Slotted Container (RSC)
The RSC box, or “Amazon-style” box, is the most common type of box used for shipping. This is the box everyone thinks of when they think of boxes. While they may look standard, they can also be dressed up with custom printing and colors, and their shape makes them highly versatile.
Easy to manufacture thanks to the lack of curves, the production of RSCs doesn’t require the use of special cutting dies or advanced cutting techniques. This makes them faster and cheaper to produce — savings you can pass onto your customer.
They require tape to be closed, which reduces the printing real estate on the top part of the box, but they’re about as equally protective as the mailer and come in at a slightly lower cost per square foot. They’re often used to transport large, heavy and fragile objects.
The Five-Panel Wrap
The five-panel wrap is the most basic form of packaging. It’s essentially a creased, unfolded piece of cardboard you must tape, glue or staple to assemble.
If you’re shipping to a distributor and all you care about is how to ship products safely and at the lowest possible cost, the five-panel wrap is a great choice.
While it can function as a great branding medium, it does require the most tape to be closed (unless you’re stapling it shut) which can take away from your message and increase assembly time.
2. The Material
Once you’ve decided what type of box makes the most sense, you’ll need to think about material.
Material
You’ll typically choose between four types of material: kraft, mottled white, kemi white or specialty paper.
- Kraft. Also known as brown cardboard, it offers a natural, earthy
feel and looks great with darker colors but is less ideal for full-color
printing, as hues can often look dull. Kraft is the least expensive choice and
usually uses pre-recycled cardboard, making it environmentally friendly as
well.
- Mottled white. Also known as oyster white, #3 white or white top. Printed colors on this material look good, although less bright than when printed on kemi white. Mottled white is typically about 10 percent more expensive than kraft.
- Kemi white. Also known as bright white, kemi is a brighter white with a light transparent clay coating that creates a slight sheen. Colors pop. It’s usually about 10 percent more expensive than mottled white and about 25 percent more expensive than kraft.
- Specialty paper. This category includes soft-touch paper, premium matte paper, satin paper and high-gloss papers. They often feel luxurious to the touch and make colors pop, but are typically quite expensive, especially for short runs.
Thickness
The flute size — the size of the squiggly lines in the middle of the cardboard — determines how thick your box material will be and how much protection it will offer.
The most common thicknesses are:
- E Flute: ~ 1.5mm
- B Flute: ~ 3.0mm
- C Flute: ~ 4.0mm
- Double Wall: ~ 7.0mm to 8.0mm
For a small box with light contents, go with a thinner flute like an E or B flute. The thinner flutes make for a better printing surface and have a less industrial aesthetic.
For a box containing large, heavy or fragile contents, choose a heavier flute like C flute or double wall for better protection and durability.
Don’t forget shipping considerations. With E Flute being half the thickness of B Flute, you can fit approximately twice as many boxes on a pallet. With shipping as expensive as it is, this can have a big impact on your final per-unit cost.
3. Size – Custom vs. Stock
When you choose a 100% custom size, if the order is small enough (approx. 250-400 boxes and under), it will typically be be cut and creased on a digital cutting machine (https://www.youtube.com/watch?v=twfkiF1iFXQ). This process has its benefits (it saves your from investing in an expensive die – approx. $250 to $700) but because it’s quite slow, it can still be quite costly.
So how do you avoid investing in a die or running the job on a digital cutter?
Easy. You select from a list of sizes that your manufacturer already has a die for!
The thing is, going the stock box route has its costs too. Settling on an oversized box means you’ll have a lot of unused interior box space which will need to be filled with void-fill. Not only is this an additional expense, it can at times make your package look less professional.
As shipment costs depend on both weight and dimensional weight (the size of your shipment), larger boxes can add a significant amount to your courier charges. Not to mention, the bigger the box, the more material you use (and pay for).
It really comes down to striking a balance. When deciding whether a stock box will work best, the base cost per box is only one part of the equation. One should consider both the cost to make the boxes and the cost to assemble them, protect the goods inside, and ship them. It’s all important.
4. Design Considerations &
Printing Method
If you plan to print on your box, you’ll want to be familiar with the following:
The Dieline
This is the 2D layout of your box — typically provided as an Adobe Illustrator or PDF file — that you will use as a template for designing your box. It acts as the foundation for creating your design and contains three lines: the cut line, the crease line, and the bleed line (the line where you’ll need to extend your art to).
Your supplier will usually provide you with an Adobe Illustrator file with the dieline included on its own Layer. Before starting your design, you’ll want to lock this layer and create separate layers for your artwork, so you can avoid accidentally altering any of the lines.
Manufacturer Artwork Guidelines
Usually listed on your supplier’s website, these are the elements you’ll need to onsider when creating your artwork. They will differ slightly from manufacturer to manufacturer, but will typically include, at a minimum, four primary instructions for how to prepare your files:
- Outline all your fonts (i.e make
sure your printer can read your font type) - Embed all images/files (i.e make
sure your printer can view your entire design) - Use vector designs or images
with at least 300 dpi (i.e make sure your art file is of high quality). - Work in and save your file in
CMYK mode instead of RGB (i.e ensure the colors you select are printable).
If that sounds like gibberish, you might want to hire a graphic designer or do some additional Googling before designing.
Configuration
The 2D view of the dieline makes it tricky to determine the orientation of your artwork, including which side of your box faces up. To visualize your box and help prevent errors, we recommend that you print out your dieline on an 8.5×11 sheet and cut and fold it into place or use our online box designer.
Printing Method
For smaller runs (approx. 500 – 750 or less) it is usually financially more sensible to go with digital printing, a printing method that utilizes no printing plates and produces high quality results. For larger runs, you have two choices: offset (litho) printing or flexo printing. For more simplistic designs (one to 4 colors), flexo printing will be the more economical choice. For those aiming to achieve photorealistic designs, offset (litho) printing will be what you need. It is more costly as it requires a separate lamination process; however at very high quantities it can be quite close in price to Flexo printing.
5. Order Quantities
The principle of economies-of-scale is pretty well understood; the more you buy, the more you save per box. But what a lot of people don’t realize is how significant this principle is when it comes to custom packaging.
When a manufacturer gets a custom order of 250-400 boxes they’ll often cut your boxes digitally. While this saves them from investing in an expensive die it also takes a lot of time to make each box – time your manufacturer has to make up in the price per box.
On the other hand, while a large order can significantly reduce your cost per unit, it can also put a strain on your cash flow and eat up valuable space in your warehouse.
Whether a large run makes sense for you often comes down to cash flow and space. If you have the cash and the space, it usually makes sense to order more than less. If you’re tight for cash and not ready to settle yet on your design, a shorter run will make more sense.
Ready to design your own packaging? Give our DIY box design tool a try!
OR simply want to learn more about ordering custom packaging? Drop us a line at contact@customboxbuilder.com and we’ll happily answer all your questions.